The Hero's Journey to Every Deployment Story
Do you feel like your knowledge of development ends with a
git push to the remote branch?
You’re very comfortable running code on your local development machine, but deployment seems complicated and unapproachable in comparison. Every single project seems to do it differently - a unique tangled-up ball of arcane rituals, scripts and tools.
Avoiding deployment topic worked for you so far, but deep down you know that this will come back to bite you someday. All because you failed to prepare. Or just because it didn’t click?
 Photo by John Barkiple on Unsplash.
Understanding deployment doesn’t need to be a struggle. You can get an unfair advantage and skip a lot of the steep learning curve.
Your Unfair Advantage
Every single deployment method can be made more approachable if you know about the hidden building blocks it’s made of.
Instead of facing a new enigma every single time, you’ll be able to split the problem up into smaller conceptual parts, and get a quicker understanding, “divide a conquer” style.
All you need, is to learn about the hidden structure which is common to every single deployment method out there.
Once you have seen it, you won’t be confused by tool choices and scripts as much anymore. You will know what to look for, and how everything should fit together intuitively.
It works in the same way, as the Hero’s Journey works for understanding story plots.
A Common Pattern
The Hero’s Journey, popularized by Joseph Campbell, is a pattern which can be found in many popular stories across the world. Once you learn about it, you can’t stop spotting it everywhere you look.
On the highest level, it splits the plot into three main stages: departure, initiation and return. The hero is torn out of his day-to-day life, fights through struggles in a dramatic fashion and finally overcomes them emerging transformed. The three main stages are further subdivided in 10 steps which fit a lot of stories. The Matrix, Star Wars, and most Disney movies fit this pattern.
You could memorize the complete 10 steps, but even if you only know the main stages it’s way easier to spot the similarities in plots and talk about them. This abstract model is a crucial tool to get a grasp of their underlying structure. With this knowledge, you are better equipped understand how they build tension and why they work.
 Photo by Esteban Lopez on Unsplash.
Deployment methods share a common structure as well. Once you know it, you can spot it across all possible deployment methods, and are better equipped to understand them.
The Structure Hidden in Each Deployment Method
Deployment is nothing magical. A finished deploy is simply a running instance of your app.
Think of the deployment process, as the journey of a single version of your code from the time it’s created in your editor towards being a running application that is reachable by its users. There are a lot of details which can be different, but in the end there’s a single starting point and goal.
To complete this journey, every deployment method can be seen as a combination of three conceptual stages. A codebase (the GitHub or GitLab repository of your app) is transformed into a deploy through those stages:
- The build stage
- The release stage
- The run stage
 The three deployment stages: build, release and run.
I first encountered the idea of “build-relase-run” stages in the 12 Factor manifesto. Back then, I got excited and a bit disheartened. Disheartened, because of the feeling that this was making sense and we were nowhere close to that ideal. Excited, because this seemed to be a very clean way to deploy a web application.
In the end, I thought that it was a great ideal to aspire to, but quite removed from the messy reality of most deployment processes. 12 Factor demands a strict separation between those stages, and that would mean a complete overhaul of something that already worked well enough.
It took me a while to realize, that even if there is no strict separation, every deployment goes through those stages. Even our somewhat-messy process. Sometimes those stages can be are hard to discern or jumbled together, but they are always there.
But first, let’s walk through each stage and talk about them in detail, starting with the beginning of your deployment’s journey: the codebase.
If you haven’t given 12 Factor a thorough read until now, you really should. It’s very useful and pretty cool.
The Codebase
This is the starting point of your code’s journey towards becoming a deployment.
You pick a single, clearly-defined state of your code. In Git, this is a commit which has a unique checksum. Sometimes, you don’t use the commit explicitly, but simply point to the most recent commit on a branch.
You can’t take your whole codebase with you. Instead, you should decide on a single version of your code to deploy. This version ventures is passed into the build stage.
The Build Stage
The chosen version of your codebase needs to prove itself worthy by overcoming first challenges during its journey towards becoming a deployment.
In practical terms, the build stage is where you do everything you can to make sure that your code isn’t broken. You run linters and unit tests. You run a local development server and click around to make sure that everything looks as it should.
Most importantly, you should create a build artifact.
The build artifact is the result of the build stage. Think of it as a snapshot of your code, bundled with information and maybe even dependencies, ready to go. If your build stage is doing a good job, your code is well equipped, being embedded in a tight package of all local dependencies it needs. If your build stage is on the meh side, there is no explicit build artifact. Your code will continue its quest by itself. Ill equipped to face the struggle ahead.
The build artifact should be able to work in any kind of environment - staging, production, or anything in between. All that’s missing should be configuration values for the environment at hand.
The Release Stage
In the release stage, the result of the build stage is combined with the configuration values of a given environment.
In the ideal world of 12 Factor, the build artifact and those config values are combined into a new entity - the release. A new bundle with a clear name, denoting the combination of a build with the configuration of an environment. It’s supposed to be in a state where it can be put into action at any time.
In the wild, a “release” is often created implicitly,. Think of checking out the latest master branch commit on the staging server, and feeding it with the local environment variables. It’s still a release, but nameless and not really deserving of the name according to 12 Factor requirements.
The Run Stage
In the run stage, a release (build combined with the right configuration values) is put to work. Your app’s processes are launched and react to requests.
The run stage can be entered multiple times with the same release (if the server is restarted), and multiple instances of the same release can be running at the same time if you’re using horizontal scaling. No biggie.
Let’s Look At Examples!
Now that you have read about the “build, release and run” stages, let’s see how they appear in the wild, by looking at the two most common real-world deployment styles out there.
Example 1: Manual YOLO Deployment With Git
This is the most simplistic way to get code online. You just made changes to the code on your local machine. You run unit tests and linters. Then you click through your local application to make sure everything works and are happy with the changes.
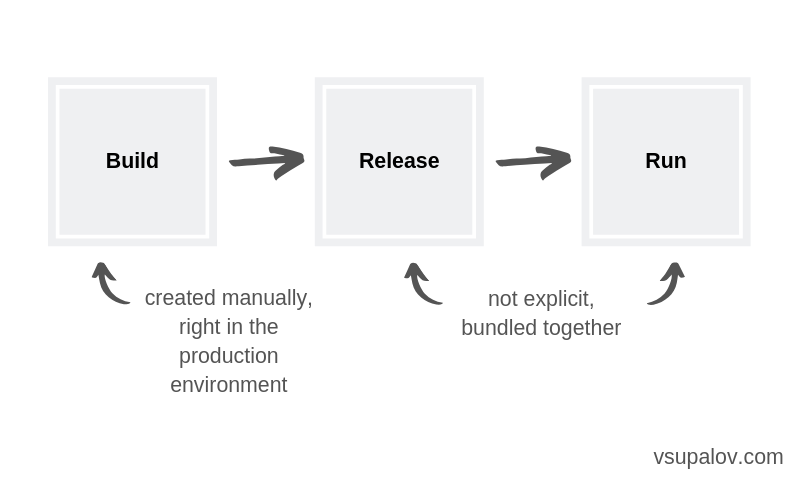 The three deployment stages of a manual YOLO deployment.
You create a (final) commit, and push it to your repository on GitHub. Now that everything is pushed, you SSH onto your VPS.
You stop your application server (Gunicorn if you’re developing in Django) for maintenance and pull the latest master commit to your project’s code folder on the remote machine.
You trust that the latest master commit seems to work, and it’s the one you want to deploy. What’s happening now, is your build stage. Only that you create your build artifact right in your production environment, ad-hoc and not really controlled. You make sure all dependencies are in the correct version, run migration and static file collection commands manually on the server.
What happens now, is the release and run stages bundled into one. You start up the application server again. It runs the new code version, providing it with existing configuration variables in the configuration of your application server.
Your app is online again, the new version of the code is deployed. This approach is pretty far from the ideal version proposed by the 12 Factor manifesto, and the downsides should be obvious. The steps are not reproducible, bundled together and in case anything goes wrong it might be hard to get back to a previously working state.
Still, the three deployment stages are present and can be pointed out clearly.
Example 2: Dockerized Automated Staging Deployment
As before, you finish your local development by creating a commit. You are relatively certain that everything should be ready to be deployed.
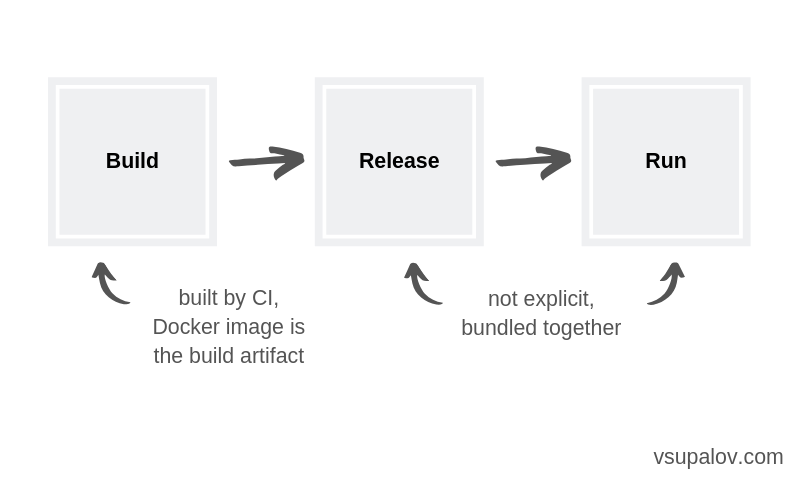 The three deployment stages of a dockerized automated staging deployment.
All you need to do now, is to push your new commits to GitLab. From there, a CI tool is triggered. It runs tests, and (if everything works as expected) builds a Docker image. The Docker image is the build artifact, which is pushed to a remote container registry. The build stage is concluded.
After the build artifact is done, the CI triggers a script. Its job, is to deploy the new build to the staging environment automatically.
The Docker image is pulled to the environment. The old containers are stopped and new containers are started from the fresh image with the right environment variables. Once again, the release and run stages are bundled together and no explicit release bundle exists.
Your app is online in staging, the new version of the code is deployed. This staging deployment can be used for automated and manual testing before rolling out this new build to the production environment in a separate step.
In Conclusion
Now you know the hidden structure hidden inside every deployment method. I hope the examples have helped you to see the “build-release-run” deployment model in action.
Having an abstract understanding of those stages will help you to see the pattern behind the details of deploying any web application. You won’t need to stumbling over tool choices and get lost in technical details to spot the big picture.
As you have seen in the examples, the strict separation of those stages isn’t present in most real-world deployment approaches. However, those patterns are still present and and are a solid starting point to understand any deployment story.
If you’re interested in learning more about real-world deployments, sign up to the mailing list below to receive future articles and level up your deployment skills.
A word from the author
Hi, I'm Vladislav. I work with small teams and bootstrapped founders who need to get their infrastructure right — reliable deployments, less operational risk, and systems that don't fall apart the moment the founder looks away. If that sounds like your situation, here's how we can work together.
I've been writing about Docker, deployment, and infrastructure since 2017. If you'd like to read more, the articles page is a good place to start — or you can sign up for the newsletter to get new pieces by email.